 The Conditional Formatting feature in Outlook allows you to get organized by automatically color coding your Emails, Calendar items, Contacts and Tasks without the need to apply a Color Category to it or move them to different folders.
The color coding isn’t just intended to emphasize certain emails but it can also be used to deemphasize certain emails such as newsletters or emails you are only a CC or BCC recipient of.
You may actually already know Conditional Formatting without realizing it as it is for instance also being used to:
- Show unread emails in a blue and bold font.
- Show expired emails and completed tasks in a grey and strikethrough font.
- Show overdue emails and tasks in a red font.
The “Conditional Formatting” feature may look complex at first but creating color coding rules is actually fairly easy and quite powerful when used the right way.
This guide will help you on your way to get yourself familiar with the Conditional Formatting options with 8 color coding examples which might be useful to you as well.
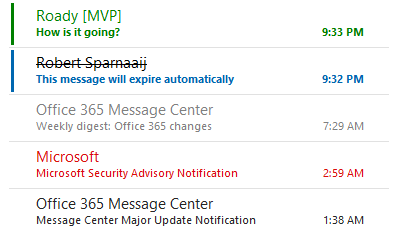
Conditional Formatting usage in the Message List.
- Conditional Formatting Basics
- Conditional Formatting Tips & Tricks
- Conditional Formatting Examples
- Links to more Conditional Formatting examples
Conditional Formatting Basics
 Creating a Conditional Formatting rule can be done in the following way;
- Open the Conditional Formatting dialog:
- Outlook 2007
View-> Arrange By-> Custom…-> Automatic Formatting… - Outlook 2010 / 2013 / 2016 / 2019 / Microsoft 365
tab View-> View Settings-> Conditional Formatting…
- Outlook 2007
To define a Conditional Formatting rule of your own, press the Add button.
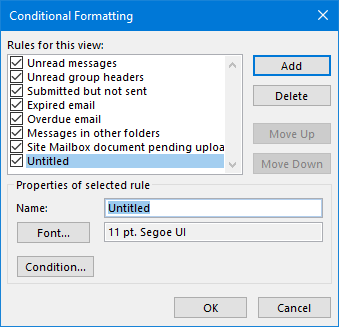
Adding a new Conditional Formatting rule.- Supply a name for the rule.
- Press the Font… button to define your Font settings.
- Press the Condition… button to specify when this font should apply.
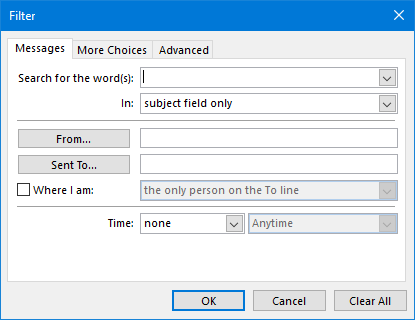
You may recognize the Condition… dialog and its usage as the same dialog is used to create a Search Folder, a View Filter or to perform an Advanced Search.
Conditional Formatting Tips & Tricks
 Just like many other “more advanced” features in Outlook, the Conditional Formatting feature may sometimes appear to have a mind of its own and produce unexpected results or no results at all.
The tips and tricks below will help you better understand how the Conditional Formatting feature works and generate its color coded view.
- You can sort the rules by using the “Move Up” and “Move Down” buttons. The higher listed rules takes precedence over the lower ones. A lower listed rule can append the formatting of a higher listed rule if the formatting is not defined.
- For instance, when in a higher listed rule the font color is set to “Auto” the color of a lower rule will apply. However, if the higher listed rule has a color defined, the lower rule will not “overwrite” this color.
- Specifying names of senders or recipients in a Conditional Formatting rules can be a bit tricky; The name must exactly match the name as displayed in the From field of the message. Better is to create the rule based on the e-mail address. If you are in an Exchange environment, you can simply add the names as listed in the Global Address Book of your company.
- The Conditional Formatting rule only applies to the folders which use the same view. To apply your custom view to other folders see: Applying custom views to all folders at once.
- If the rule doesn’t do what you expect it to do once created, you might want to try to remove or even isolate statements (by creating a separate rule for that statement) to find out where things go wrong.
- Do not add too much color to your mailbox or the organizing effect gets lost (but you’ll be left with a nice rainbow though
 ).
).
Conditional Formatting Examples
 I’ll explain the advanced color editing by the following examples/ideas. The examples are getting more advanced each time so when you’ve practiced them all you should be able to handle it as a pro as you are not limited to these examples;
- Example 1: Color code messages coming from someone specific (like your partner)
- Example 2: Color code messages that are sent to a specific email address
- Example 3: Color code messages by words in the message
- Example 4: Color code messages by Category
- Example 5: Color code messages when the message is larger than 1MB and contains specific words
- Example 6: Color code messages received today addressed directly to me coming from specific persons
- Example 7: Color code messages that have a receipt request and is considered confidential
- Example 8: Color code a meeting request where you have not yet responded to
Example 1: Color code messages coming from someone specific (like your partner)
- Open the Conditional Formatting dialog, add a new rule, name it, specify a font and press the Condition… button.
- In the “From” field, type the email address of the sender or (when you are in an Exchange environment), press the From… button and select the sender from the Global Address List (so not your Contacts folder as explained here).
- Press OK to close the Filter dialog.
- Press OK to close the Conditional Formatting dialog. Your rule will apply immediately to al messages already received which correspond to the rule just created.
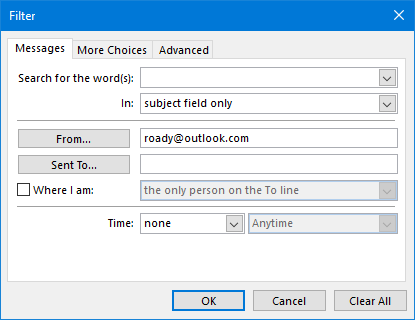
Color code messages coming from a specific address.
Example 2: Color code messages that are sent to a specific email address
- Open the Conditional Formatting dialog, add a new rule, name it, specify a font and press the Condition… button.
- In the “Sent To” field, type the email address of the recipient or (when you are in an Exchange environment), press the Sent To… button and select the recipient from the Global Address List (so not your Contacts folder as explained here).
- This rule can be useful to highlight that the email was also sent to for instance your manager or a colleague, a distribution group or to a newsletter alias.
- Press OK to close the Filter dialog.
- Press OK to close the Conditional Formatting dialog. Your rule will apply immediately to al messages already received which correspond to the rule just created.
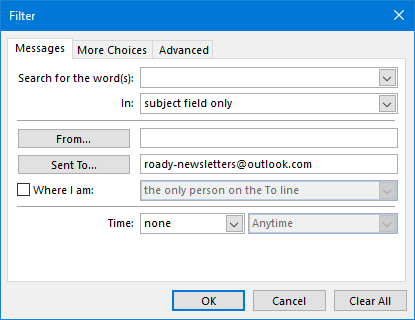
Color code emails that were sent to a newsletter alias.
Example 3: Color code messages by words in the message
- Open the Conditional Formatting dialog, add a new rule, name it, specify a font and press the Condition… button.
- In the “Search for the word(s)” field add the words Conditional Formatting should respond on.
- By the “In” dropdown list you can specify whether to look in Subject, Subject and Body or common mail fields (like From or Category).
- Press OK to close the Filter dialog.
- Press OK to close the Conditional Formatting dialog. Your rule will apply immediately to al messages already received which correspond to the rule just created.
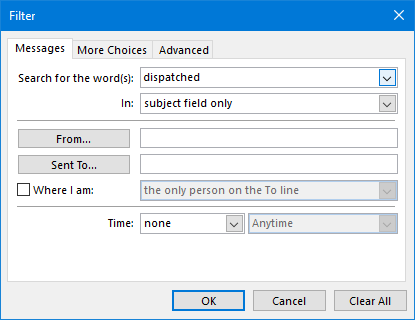
Color code messages based on the word “dispatched”.
Example 4: Color code messages by Category
- Open the Conditional Formatting dialog, add a new rule, name it, specify a font and press the Condition… button.
- Press the More Choices tab.
- Press the Categories… button.
- Select the categories you want Conditional Formatting to apply to. When you are done selecting categories press OK.
- Press OK to close the Filter dialog.
- Press OK to close the Conditional Formatting dialog. Your rule will apply immediately to al messages already received which correspond to the rule just created.
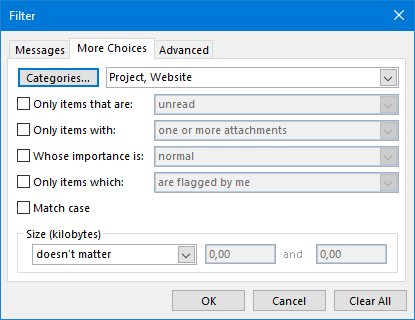
Color code messages based on Categories.
Example 5: Color code messages when the message is larger than 1MB and contains specific words
- Open the Conditional Formatting dialog, add a new rule, name it, specify a font and press the Condition… button.
- In the “Search for the word(s)” field add the words Conditional Formatting should respond on.
- By the “In” dropdown list you can specify whether to look in Subject, Subject and Body or common mail fields (like From or Category).
- Press the More Choices tab.
- At the bottom, in the Size section, press the down arrow where now “Doesn’t matter” is displayed and set it to “Greater than”.
- One text area will become active now. In this window type 1024 (1024 kilobytes is 1MB).
- Press OK to close the Filter dialog.
- Press OK to close the Conditional Formatting dialog. Your rule will apply immediately to al messages already received which correspond to the rule just created.
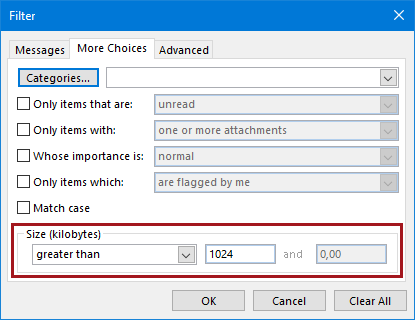
Color code messages based on their size.
Example 6: Color code messages received today, addressed directly to me coming from specific persons
- Open the Conditional Formatting dialog, add a new rule, name it, specify a font and press the Condition… button.
- At the bottom next to Time press the down arrow, where now “none” is displayed, and set it to “received”.
- The dropdown list next to “received” will now become active and is set to “anytime” by default. Set this to “today”.
- In the Sent To… field type your e-mail address. If you’ve got more than one e-mail address configured in Outlook you can enter here more than one e-mail address. When specifying more than 1 address, make sure you divide them with an ” ; “.
- In the From… field type the addresses of the people you want Conditional Formatting to respond to. Again; mind the rules about using the From… button
- Press OK to close the Filter dialog.
- Press OK to close the Conditional Formatting dialog. Your rule will apply immediately to al messages already received which correspond to the rule just created.
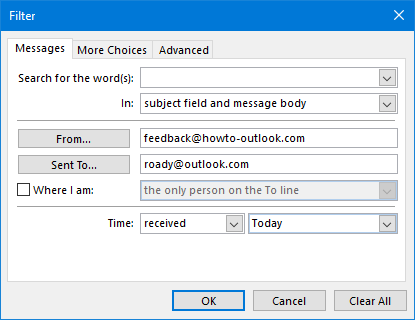
Color code messages based on the From, To and Received fields.
Example 7: Color code messages that have a Receipt Request and is considered Confidential
- Open the Conditional Formatting dialog, add a new rule, name it, specify a font and press the Condition… button.
- Press the tab Advanced.
- Press the Field button.
- Navigate to and select All Mail Fields-> Receipt Requested.
- You’ll now see “Receipt Request” in the text box under Field and next to it (under Condition) you’ll see a dropdown list set to “equals to” and next to that (under Value) you’ll see a dropdown list set to “no”. Set this value to “yes”.
- Press the “Add to List” button. The statement is now added to the “Find items that match these criteria:” list.
- Again press the Field button.
- Navigate to and select Frequently-used fields-> Sensitivity.
- You’ll now see “Sensitivity” in the text box under Field and next to it (under Condition) you’ll see a dropdown list set to “equals to” and next to that (under Value) you’ll see a dropdown list set to “normal”. Set this value to “confidential”
- Press the “Add to List” button. The statement is now added to the “Find items that match these criteria:” list so you’ll now see both statements just created.
- Press OK to close the Filter dialog.
- Press OK to close the Conditional Formatting dialog. Your rule will apply immediately to al messages already received which correspond to the rule just created.
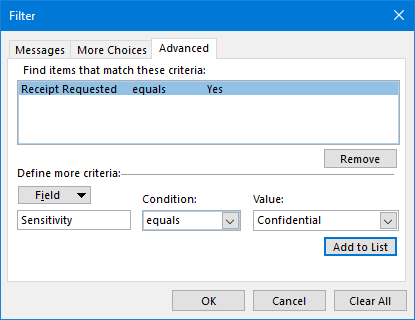
Color code messages based on multiple Advanced filter fields.
Example 8: Color code a Meeting Request you have not yet responded to
- Open the Conditional Formatting dialog, add a new rule, name it, specify a font and press the Condition… button.
- Press the tab Advanced.
- Press the Field button.
- Navigate to and select All Appointment fields-> Meeting Status.
- You’ll now see “Meeting Status” in the text box under Field and next to it (under Condition) you’ll see a dropdown list set to “equals to” and next to that (under Value) you’ll see a dropdown list set to “Meeting organizer”. Set this value to “not yet responded”.
- Press the “Add to List” button. The statement is now added to the “Find items that match these criteria:” list.
- Press OK to close the Filter dialog.
- Press OK to close the Conditional Formatting dialog. Your rule will apply immediately to al messages already received which correspond to the rule just created.
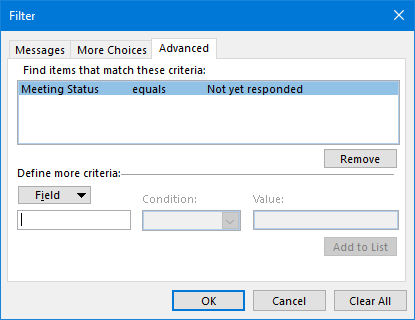
Color code Meeting Requests you haven’t yet responded to.
Well that should be it! You are now able to create rules with combined types of conditions. Again; If the rule doesn’t do what you expect it to do once created you might want to try to remove or even isolate statements (by creating a separate rule for that statement) to find out where things go wrong.
Links to more Conditional Formatting examples
 Do you want more examples of how Conditional Formatting can be useful to you?
The links below contain many more scenarios for which you can use Conditional Formatting like for instance to Color Code your Calendar without the need to use Color Categories (which people you share your Calendar with may not see).
- Color coding Holidays, Birthdays and Anniversaries
- Visual difference between Appointments and Meetings in the Calendar
- Highlight or Color Code emails from known Contacts
- Search Folder or Conditional Formatting for internal company emails
- Highlight mail coming from a specific domain
- Color code folders in Search results
- You may have been BCCed warning
- Finding messages which are set to expire
- Delete or mark an email automatically at a set date
- Highlight/sort Meeting Receipts which contain text
- Moving or making Automatic Replies (OOF) stand out more
- Who has already read that message in our shared mailbox?
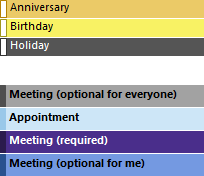
Conditional Formatting in the Calendar.


