 Creating and selecting a signature is not that difficult in Outlook. However creating the signature you want with for example a company logo in it can be quite of a hassle.
This guide will cover both the basics and advanced examples for creating, using and managing signatures in Outlook.
It also contains lots of tips about do’s and don’ts and how to overcome some common signature issues.
Basics
- Creating a new signature
- Using the Signature Editor
- Assigning default signatures
- Inserting and changing signatures manually
- Backing up your signatures
Advanced
- Modifying the Plain Text signature
- Creating a Signature from a HTML template
- Adding variables, random quotes and more
- Creating signatures in OWA
- Signatures in a corporate environment
Creating a new signature
 As stated before, creating a simple signature in Outlook isn’t a hard task. Most likely you already have one. To create a signature and set options for it you go to;
- File-> Options-> section Mail-> button Signatures…
When pressing the Signatures… button you’ll get an overview of the already configured signatures. Press the “New” button to create a new signature.
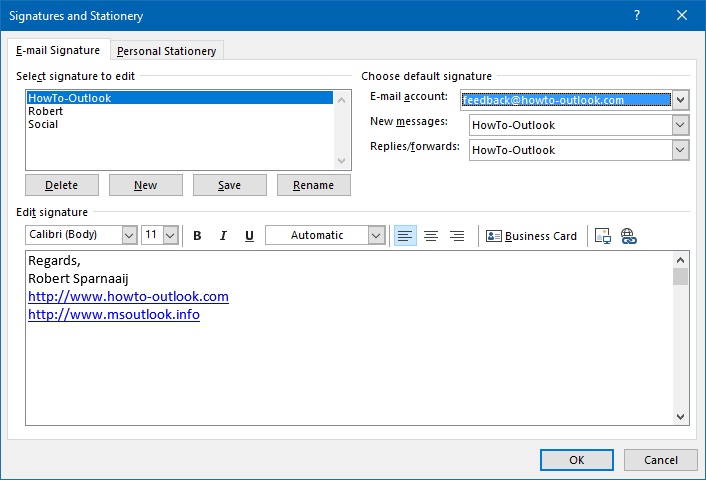
Outlook’s main window to create and manage Signatures.
Using the Signature Editor
 The Signature Editor may look a little bit confusing to some at first while others may get the impression that a lot of formatting options are lacking. In the next few sections, we’ll cover the basics of the Signature Editor together with some tips and tricks to get the most out of it with relative ease. When you still need more customization options, the Advanced section has you covered.
Using different Fonts
 Modifying the font setting is probably pretty much self-explanatory. The only real thing to note is that you shouldn’t use too exotic fonts for your signature. This is because in order for the receiver to see your signature as you intended, that font also needs to be installed on the machine of the recipient. If that font is not installed, then the receiver would see that text in a different font, the wrong characters or even just placeholder characters (empty square boxes).
Tip!
In general, it is pretty safe to use the Windings font if you want to use characters such as * 8 ( to represent information for things such as e-mail address, web address and phone number.
However, use it with caution as recipients working on non-Windows computers might not have this font installed. It is also needed to edit your Plain Text signature as otherwise you’ll only see the characters which in this case would be; * 8 (
Adding a picture/logo
 Adding a picture or a logo to a signature is quite easy but there are a few tricks to it to do it properly.
- Prepare the picture or logo that you want to use;
Edit it in a picture editing program so that it has exactly the dimensions as how you want to use it in your signature. - Save it in a format that makes the file size as small as possible;
The jpg-format works well for pictures, the png-format works well for detailed graphics and the gif-format works well for simple graphics. You should aim for an end-result not larger than 10KB. - Decide whether you want to embed or link the image;
Embedding the image into your signature means that it gets included into each and every message that you send. When you link the image, the image itself isn’t included in the message but you locate it on the web and have it load from there. In case of the last, you must also set the option for Outlook to send a link instead of a copy for linked images.
Once that you have prepared your image, you can insert it in the following way;
- In the Signature Editor, press the image icon (between the Business Card icon and the Hyperlink icon)
- In the dialog that pops-up, you can browse to the location of the image that you want to insert.
- If your picture is located on the web, then type its URL in full. For instance; http://www.yourdomain/images/signaturepic.png
- To maintain the URL reference to the picture, you must also use; Insert-> Link to File

Link to File will load the image from the Internet.
Note:
Pictures are not shown in the Plain Text version of your signature. If the picture contains some important details, you can edit your Plain Text signature manually to add this information in text form.
Adding hyperlinks
 While you could add a link to a website by simply typing it in full, it will probably look nicer when you type for instance the name of your company and make that link to your corporate website or have the word, “Facebook” or “Twitter” link to your profile page.
To add such a link, first type and then select the word that you want to make clickable. To add the link, click the globe icon on the right.
You can even combine this with inserting a picture or logo and then make this image clickable via a hyperlink.

Link images to social pages in your signature.
Note:
If you insert clickable text in your signature, only your text will be shown in the Plain Text signature and the link itself will be gone. To overcome this, you can edit your Plain Text signature manually to replace the text with the link in full.
Adding a business card
 Another option is to include a business card (vCard) to your signature. A vCard is a vcf-file that contains contact information. The Signature editor will let you easily create a vcf-file based on a contact you’ve stored in you’re address book. People receiving the vcf-file can now easily add all you’re contact information in their favorite address book as the vcf-format is supported by many contact management programs.
Adding a business card will also add an image representation of your business card to your signature. You can edit this image by opening your contact from the Contacts folder and press the Business Card button in the Options section. When you remove the vCard image in the signature editor, it will also remove the vcf-file from your signature.
Tips!
If you want to create a signature with a vcf-file but do not want to have an image of it added to your signature design, then see this Quick Tip; Add a Business Card to a Signature but without the image.
If you want to create a signature with just the image of your business card and not attach a vcf-file see the Quick Tip; Add Business Card image to signature without vcf-file
You can also type something like “Get my vCard” in your signature and link it to a vcf-file you uploaded to the Internet to let people easily add your contact details without needing to add a vcf-attachment to your e-mails.
In Outlook 2013, 2016, 2019 and Office 365, if you have the People view selected for your Contacts folder, you won’t be able to modify the Business Card or Contact Image. To do this, you must open the full contact editing form first.
Advanced Edit
 When you are an “Outlook veteran” you may remember that Outlook 2003 and previous also had an “Advanced Edit…” button which opened your default HTML-editor to create or edit your signature in, instead from within the built-in Signature editor.
This feature is no longer available but you can still create or edit your signature within a HTML editor by using the Signatures folder.
Assigning default signatures
 To have your signature always be added to your messages, you can set it as the default. You can do this in the Signature editor itself. You can specify a default signature for new e-mails and the same or another signature on replies and forwards.
You can even specify different default signatures on an account basis. This means that when you have multiple e-mail accounts configured in Outlook and you were to change your sending account when composing a message, your signature will change automatically as well.
Note:
For the automatic signature feature to work, you must have a default signature assigned to each account. This can even be an empty signature or a signature with just a space, a full stop or some dashes (–) in it.
Tool Tip!
With VBOffice SAM, you can also let Outlook automatically select the correct signature for you based on the folder that you are in, which category has been assigned to a message or who you are sending your message to.
Inserting and changing signatures manually
 If you do not like to have a default signature set for some or all of your mail account, you can still add a signature manually or select a different one when you are composing your message.
To manually insert a signature into your message, you can use the Signature button in the Include section of the Message tab.
To manually change a signature, you can also use this button or right click somewhere within the signature area and select your signature from the pop-up dialog. If you signature only contains an image, don’t right click on the image but click in the margin directly left or right from it.
Tip!
Are you using the Signature feature to quickly insert message templates?
This is not recommended but luckily there are many other methods in Outlook to create and use message templates.
Note:
If changing the signature removes (part of) your message as well, you’ve been typing into the signature area. When that happens, undo the signature change immediately (CTRL+Z), select the text portion of your message and press CTRL+X (to cut to Clipboard). After this, change your signature and paste the text back into your message (CTRL+V). For more details see Email empty when changing signature.
Backing up your signatures
 After you’ve carefully created your signatures, you probably want to back them up or migrate them to another or new computer at a later time. The process is very simple; Copy all the files from the Signatures folder to your backup location. To restore them, you can copy them back to the Signatures folder.
By default you can find the Signatures folder in the following location;
C:\Users\%username%\AppData\Roaming\Microsoft\Signatures
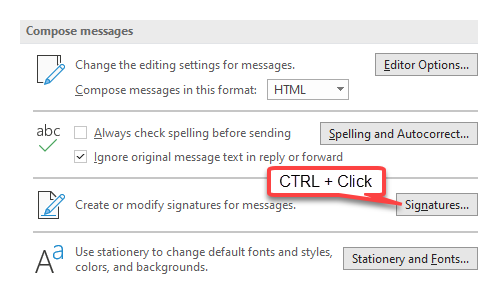
Or quickly open the folder by holding CTRL when clicking the Signatures… button.
If you want to backup just a single signature, look for the following files and folders;
<signature_name>.htm
This file is used when creating HTML messages.<signature_name>.rtf
This file is used when creating Rich Text messages.<signature_name>.txt
This file is used when creating Plain Text message.<signature_name>_files
This folder is used to store supporting files for your signature such as formatting, images and/or business cards (vcf-files).
Tip!
When you are using multiple computers, you can use your OneDrive or DropBox account to sync your Signatures between them so that they are always the same. For instructions see: Synchronizing email signatures between computers.
Modifying the Plain Text signature
 Once you’ve created a signature, you might want to edit the signature to make it look better in Plain Text formatted mail.
Plain Text, as the name suggests, does not support any type of formatting and thus your signature might look quite different from your HTML version. Common reasons for why you want to edit just your Plain Text signature afterwards are;
- Your signature contains an image with relevant information.
As the image is not displayed, this information is missing. Examples are having a business card picture or a company logo inserted instead of a company name in text. - Special text formatting
If you used Wingdings or tables, your text could be display wrong. By modifying the Plain Text signature manually, you can replace those characters and fix the aligning. - Hyperlinks
If you’ve got linked words such as for instance to a website, then in the Plain Text version of your signature only the text remains and the links are gone. Editing the Plain Text signature will allow you to add back the URL in full.
To edit just your Plain Text signature, you can open the txt-file directly from the Signatures folder. It is highly recommended to make a backup of your signature afterwards, as your changes will be overwritten when you were to edit your signature in the Signature Editor afterwards.
Creating a Signature from a HTML template
 You may already have a html-file of your signature or designed your signature in a HTML editor as the Signature Editor did not support your design (like for instance using tables). To get that signature into Outlook, you can either open it in a browser and copy it from there and paste it in the Signature Editor in Outlook or directly copy the html-file in the Signatures folder just like a restoring a backup.
When you’ve copied the file directly into the Signature folder but did not create a Plain Text or RTF version of it, you can open the Signature Editor and re-save signature to automatically create these file.
Note:
Emails aren’t webpages so not all HTML tags and properties are supported. For instance, scrolling text (marquee) isn’t supported and neither are various new HTML5 tags and CSS3 formatting styles. For an overview of what is supported see; Word HTML and CSS Rendering Capabilities in Outlook.
Adding variables, random quotes and more
 If you want to go beyond the feature that Outlook has to offer for signatures, there are various add-ins available.
Random Quote Insert
Add a famous quote to the end of your emails with the Random Quote Insert add-in. It comes packed with already 500 quotes to choose from and you can easily add your own as well.
Discount code: BH93RF24
Live Signatures
With Live Signatures you can use variable in your signature which will be filled automatically when you insert your signature. This will allow you to insert up-to-date last minute information when sending out your message. Common uses for this is to include content which is updated by somebody else or from an RSS feed (latest headline from your company for instance).
Discount code: 4PM76A8
Bells & Whistles for Outlook
Amongst many other features that Bells & Whistles for Outlook has to offer it will let you create multiple rich text or HTML email signatures and have them automatically inserted into your emails. Using the rules options, you can setup different signatures for different email accounts or contacts.
Discount code: time-saver25
Creating signatures in Outlook on the Web (OWA)
 When you are using Outlook.com or are working in a corporate environment and also have access to your Exchange mailbox via Outlook Web Access (OWA), then you’ll notice that your Outlook signatures are not available there. You’ll have to set these up again in OWA as well.
You can find the Signature option in OWA in the following locations;
- OWA 2013
Press the Gear icon in the top right corner-> Options-> Settings - Outlook on the Web 2016
Press the Gear icon in the top right corner-> Options-> section: Mail-> Layout-> Email signature - Outlook on the Web 2019
Press the Gear icon in the top right corner-> Options-> section: Mail-> Layout-> Email signature - Outlook on the Web (Outlook.com and Microsoft 365 Exchange Online)
Press the Gear icon in the top right corner-> at the bottom: View all Outlook settings-> Mail-> Compose and reply-> Email signature
Adding images to OWA signatures
 You’ll find the options available to you to be quite similar to the options that are available in Outlook. However, an option that you may find missing in OWA is to add an image to your signature. Via a workaround, it is still possible to add this in the following way;
- Place the picture on a web location if it is not available on-line yet like for instance the company logo on the corporate website.
- Browse to this location on the web.
- Right click on the picture that you want to add and choose Copy.
- Right click in the signature in OWA and choose Paste.
- Click “No” when you get a security prompt about content coming from a non-HTTPS source.
- Don’t forget to save the signature by pressing the Save button in the Options screen.
Note:
If the picture does not show up and a text-based link is displayed instead, disable the S/MIME control in OWA via the Security section.
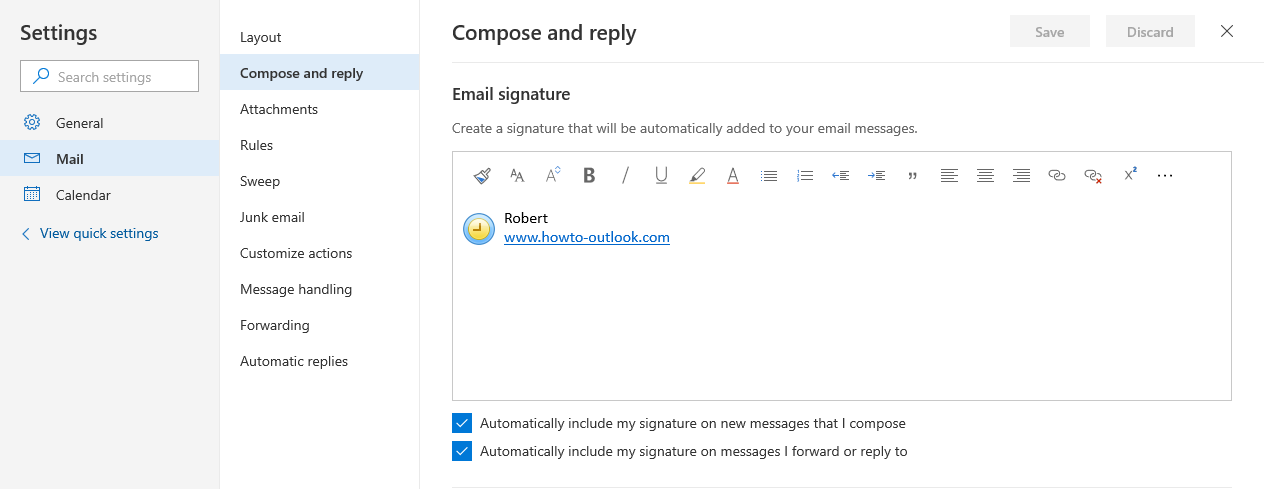
It’s possible to add a picture to a signature in Outlook on the Web and OWA as well.
Signatures in a corporate environment
 When you are in a corporate environment and are responsible for proper signature usage in your corporation, then you might want to consider ways to centrally manage signature usage. This can be achieved in various ways such as via a script to generate personalized signatures on the client or mail server or a combination thereof. There are also specialized tools for this such as CodeTwo Exchange Rules and CodeTwo Email Signatures for Office 365.
For an example of a client script and instructions how you can configure Exchange to automatically generate user signatures or append corporate disclaimers to outgoing messages see the guide; Setting up a Corporate Signature.
Disabling the signature option in Outlook
 When you are centrally managing your user’s signatures, then disabling the Signature option would be recommended. This will prevent users from adding signatures of their own and ending up with messages with a double signature.
Disabling the signature feature can be done via Group Policies. You’ll find back the option in;
- User Configuration-> Administrative Templates-> Microsoft Outlook-> Outlook Options-> Mail Format-> option: Do not allow signatures for e-mail messages
Note:
When you set this option, don’t forget to inform your users about it so that they won’t be confused about the option not being available and to instruct them not to type a signature manually into each message.
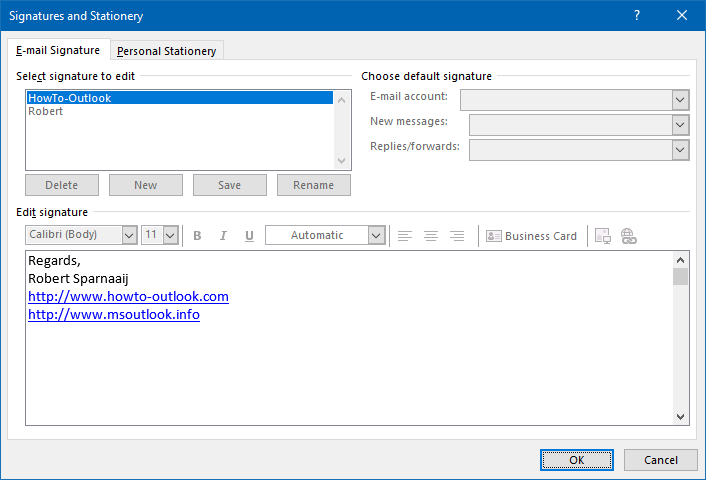
The signature section will appear grayed out after setting this Group Policy setting. (click on image to enlarge)
Disclaimer text
 If you need to add a disclaimer text and you are responsible for adding it; keep it short! There is nothing more annoying for the receiver to see a short message become massive just because of some disclaimer text.
Consider posting the disclaimer text to a page on the corporate website and only add a link to it at the bottom of the message with “Please read our disclaimer” or something like that.
If you are automatically adding the signature via Exchange, you can configure it in such a way that the disclaimer is only added for external messages. For an example see Setting up a Corporate Signature.


