 An Outlook mail profile is a combination of settings and files to support the configured accounts. A single mail profile can contain multiple mail accounts and different account types such as POP3, IMAP, Exchange and Outlook.com accounts.
However, in some cases it might be recommended or required to create an additional Mail Profile or to recreate the current one.
- Need for an additional mail profile or recreating it
- Mail applet location
- (Re)creating a mail profile
- Prompting for a mail profile to be used
- Optional but still recommended
Need for an additional mail profile or recreating it
 Common reasons to add or recreate a mail profile are;
- The current mail profile is damaged.
- You upgraded/downgraded to another Outlook version (recommended and sometimes needed).
- To create separate Outlook working environments such as Work and Private.
- Need to connect to separate Exchange environments with Delegate mailboxes (as only your first Exchange mailbox supports Delegate mailboxes).
- Separately manage an additional Exchange mailbox for which you have Full Access rights (for rules, Automatic Replies, and Delegate access management).
- Testing.
Mail applet location
 Mail Profiles can be managed via the Mail applet in Control Panel. There are various methods to open it.
Method 1: Control Panel
When you are using the Control Panel is in the classic layout, you should see the Mail applet directly in the list of icons.
When you are using the Control Panel in the Category View, you can find the Mail applet in the following category:
- Windows 7: User Accounts and Family Safety
- Windows 8: User Accounts and Family Safety
- Windows 10: User Accounts
- Windows 11: User Accounts
Windows 10 and Windows 11
Make sure you open Control Panel and not the Settings app.
Method 2: Outlook 2016, 2019, 2021 and Microsoft 365
When you are using Outlook 2016 (not the MSI version), Outlook 2019 or Outlook as part of an Microsoft 365 subscription, you can also the Mail applet from within Outlook via;
- File-> Account Settings-> Manage Profiles
Method 3: manageprofiles command line switch
Another way to open the the Mail applet is by using the managemailprofiles switch. This requires Outlook 2016 (not the MSI version), Outlook 2019, Outlook 2021, or Outlook as part of an Microsoft 365 subscription.
- Start-> type;
outlook.exe /manageprofiles

There are various ways to open the Mail applet.
(Re)creating a mail profile
 Once you’ve located and opened the Mail applet, you can recreate your mail profile via the following steps:
- Press the button Add…
- Do NOT use Copy… not even when you want to recreate your mail profile or you’ll end up copying the corruption as well.
- Do NOT delete your old profile, not even when it is corrupted, before you’ve verified that the new one works. You might want to lookup some account settings afterwards.
- Enter a name for your new Mail Profile.
- Fill out the Auto Account Setup dialog or select to configure the account manually.
- When using Auto Account Setup, Outlook will try to determine and configure your account automatically. If this fails you can still choose to configure it manually with the information provided by your ISP.
- When you use the manual configuration, make sure you choose the correct account type. Ask your ISP or administrator if you do not know this.
- When you want to use POP3 or IMAP and are using Outlook.com (Hotmail), Gmail, Microsoft 365, Yahoo, or iCloud, you can find the settings you need here.
- Important!
Outlook 2016, Outlook 2019, and Microsoft 365 do not support manual configuration of an Exchange account. You must use Auto Account Setup. Your settings will be received via AutoDiscover.
- Follow on-screen instructions to (further) configure your account. Again; Ask your ISP or administrator if you do not know these details.

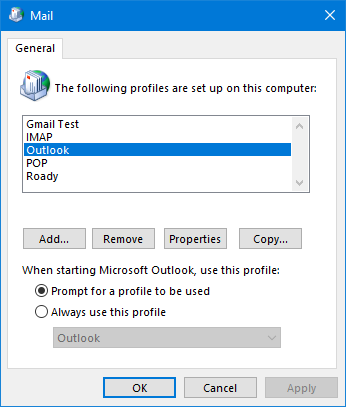
An overview of configured mail profiles for Outlook.
It is configured to prompt with which profile Outlook should be started.
Prompting for a mail profile to be used
 Now that you’ve added an additional mail profile you should configure Outlook to prompt you for which profile you want to start Outlook with. You can do this in the same Mail applet opened in step 1 and select “Prompt for a profile to be used.”
If you just want to recreate your mail profile instead of adding a new one you can configure it to use your newly created profile as the default by selecting “Always use this profile” and select your new profile.
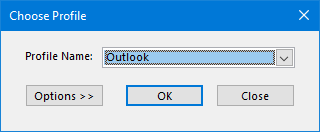
When using Outlook 2016 (not MSI), Outlook 2019, Outlook 2021, or Outlook as part of a Microsoft 365 subscription, then you can also trigger this prompt via;
- File-> Account Settings-> Change Profile
Outlook will close automatically but you’ll have to start it manually again to get prompted for the Mail Profile.

Mail Profile selection dialog.
Note:
To switch between Mail Profiles, you must close and restart Outlook. It is not possible to switch between Mail Profiles when Outlook is running. If upon restarting Outlook you won’t get prompted to select a mail profile, it could be that you have Outlook shutdown issues.
Optional but still recommended
 Leave copy on server
If you are using a POP3 account and you want to leave a copy on the server, press the “More Settings…” button when configuring your account and select the Advanced tab to configure this option. You can find more information about this settings in this Quick Tip.
Adding back your previous emails and archives
When you are done creating the mail profile, you might want to add a pst-file to it like your original pst-file or an archive file. To do this, open Outlook and choose;
- File-> Open & Export-> Open Outlook Data File…
Deliver your email to your original pst-file
If you want new e-mails delivered to another pst-file you must change the default delivery location.
- File-> Account Settings-> Account Settings…
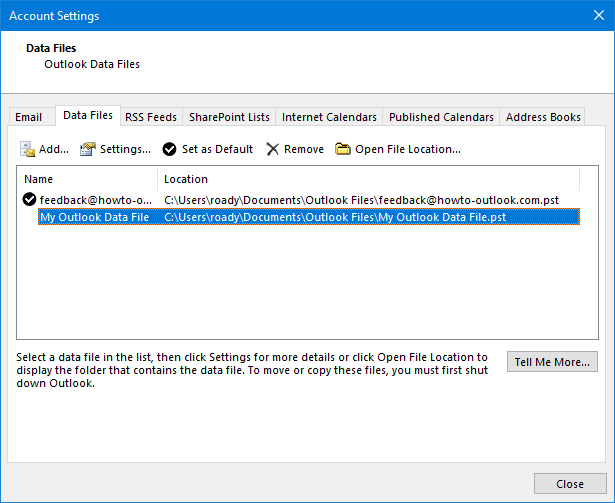
- Select the tab: Data Files
- Select the name of the pst-file you want mails delivered to and press the “Set as Default” button.
- Restart Outlook.
Tip!
If you are multiple POP3 accounts, you can also configure Outlook to deliver the emails for each POP3 account to a separate pst-file.

Selecting the default delivery location of new e-mails for POP3 accounts.
Removing the empty pst-file
When you’ve reconnected your original pst-file to Outlook and set it as the default delivery location, you might want to remove the empty pst-file you created during the profile configuration. For this, you’ll need to disconnect the pst-file first:
- In Outlook, open your list of connected data files:
- File-> Account Settings-> Account Settings…-> tab Data Files
- Remember the path to the pst-file you want to remove.
- Press Remove.
- Close Outlook.
- Go to the location of the pst-file.
- Delete it.
Important!
Don’t start with deleting the pst-file or you’ll end up corrupting the Mail Profile.
Removing the old Mail Profile
Now that you’ve fully configured your new profile and verified that it works, you might want to remove the old one;
- Go to Control Panel-> Mail-> button Show Profiles…
- Select the profile the old profile.
- Press Remove.
You’re done! You should now have a properly configured account with your original pst-file as the default delivery location.


