Setting the correct permissions on mailboxes and Outlook folders can be done in several ways when you are in an Exchange organization. The correct way for you depends on your needs. While some methods look quite the same the results can be very different. This guide explains in which way you can set permissions and what their results are.
Basically there are three ways of setting permissions;
Via Exchange
This is where it starts. To be able to set permissions you must have them yourself. When your administrator creates your account he/she will also create a mailbox with you as the owner of the mailbox giving you automatically full permissions. This enables you to create an Outlook mail profile so you can start Outlook with your mailbox as the Outlook Today folder and allows you to set permissions for others.
Exclusive permissions for this method;
- Setting an owner for the mailbox so a mail profile with your mailbox as the Outlook Today mailbox. (full mailbox Exchange permissions required)
- Set Send As Owner permissions (Send As mailbox permissions are required)
- Set Send On Behalf Of Owner permissions. This can be controlled from within Outlook as well so your administrator doesn’t really have to be disturbed for this one.
Via the Permissions tab in Options
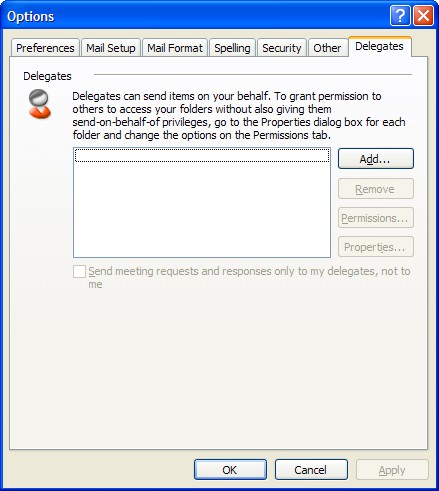
This is where you can set permissions on the mailbox shown as the Outlook Today mailbox. In Outlook choose Tools-> Options-> tab Delegates and the following screen will show;

From within this interface you can add people from within your organization to the delegates list and set appropriate permissions for them on the following folders; Calendar, Tasks, Inbox, Contacts, Notes and Journal. Setting permissions this way is probably the easiest and fastest. It also allows you to set some permissions which can’t be set by any other way.
The following permissions can be set on the folders;
| Permission | Effective setting |
| None | None |
| Reviewer | Can read items |
| Author | Can read and create items |
| Editor | Can read, create and modify items |
Note that you are only setting permissions on the folders that are listed and on not their subfolders.
Once these permissions have been set the delegate can open the folders they’ve got permissions to by File-> Open-> Other User’s Folder…
Exclusive permissions for this method;
- All delegates will have Send On Behalf Of Permissions (also possible by Exchange permissions but since you can control it yourself it’s not needed to bother your administrator about it)
- On the Delegates tab you can set the option that copies of invitations for meetings are also send to the delegate. This is handy when you have someone planning your appointments.
- In the Delegates Permissions window you can set the option that the delegate can also see messages marked as private.
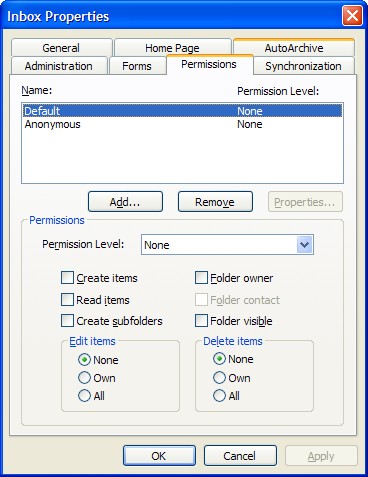
Via the Permissions tab on the folder
This method gives you the best control on how others can access your folders. This also makes this method the most time consuming one.
Besides from the Permissions you can set shown in the table above you can also make adjustments to them by selecting or deselecting the available options.

Be careful with setting permissions for Anonymous cause you’ll end up giving those permissions to everyone in your Exchange organization.
This method can be used so that people can add your mailbox to their Folder List and makes accessing your folders just as quick and easy as accessing your own. If you do this you must make sure that you have at least Folder Visible permissions on that folder and on the one above to make travelling to that folder possible. If you don’t do this you won’t be able to expand the folders. So if you want to add a subfolder of someone else’s mailbox to your Folder List you’ll need to set permissions not only on that subfolder but also on the Inbox folder and the Outlook Today folder.
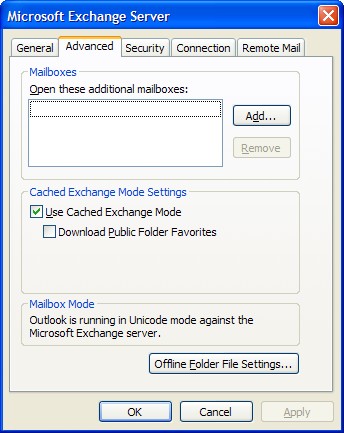
Once the permissions have been set you can add the mailbox by Tools-> E-mail Account-> button Next-> select Exchange Service-> button Change-> button More Options …-> tab Advanced-> button Add.

You can do this faster by right clicking Outlook Today-> Properties-> button Advanced-> tab Advanced-> button Add.
Exclusive permissions for this method;
- The only method that enables you to set per folder permissions
- Enables you to set permissions without giving the delegate Send On Behalf Of permissions
- Allows you to set more specific permissions.


 When you use Rules to sort your outgoing e-mails into folders you’ll notice that you can actually only “move a copy” to that folder. This rule is quite unclear and actually contradicts itself; does it move or does it copy?
 Creating and selecting a signature is not that difficult in Outlook. However creating the signature you want with for example a company logo in it can be quite of a hassle.
 When writing in Word, you may sometimes want to send the contents in an email. While you could send it from Word as an attachment File-> Share menu or simply copy/paste the contents in a new email there are some more sophisticated means as well.
 When you create a macro and are running Outlook with the default security settings, you are not able to run the macro at all or you’ll always get prompted first, unless you either tamper with the default security settings or sign your own code with a digital certificate.
 You’ve probably come across this at least once; You receive a nicely HTML formatted message with embedded pictures so the sender can tell the story with the pictures.
 If you accidentally permanently deleted an item via SHIFT+DELETE or emptied your Deleted Items folder by mistake, and don’t have a recent back up to restore from, you can use this guide to try recover those deleted messages.
 When you are in an Active Directory network environment, you can set Outlook policies to enforce settings on a specific or a group of users or computers.


 Outlook uses Word as the HTML rendering engine and although many features have been added over the years and marketers have compensated for these limitations, it could still sometimes end up in a malformed display of the email message.